Having issues with your microphone on Windows 10? Follow this guide to help you find a solution. First, determine the brand and model of your microphone. This will enable you to look up any known issues associated with the device, as well as any troubleshooting steps specific to that particular model. After that, proceed with the troubleshooting process.
You can start fixing your microphone by doing the following steps:
Table of Contents
Check the Microphone Connection
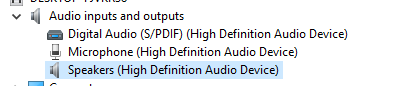
If a microphone isn’t recognized on Windows, then the problem might be with the connection. You can do the following options for you to solve the problem.
- Unplug the microphone on the computer and plug it back. You would hear a sound that’s a sign that Windows has recognized a device. But if you don’t hear any sound, you open the Start Menu and Search for Device Manager. Then, you select the option that appears on the screen.
- Next, you click the audio inputs and output function that you see on the Device Manager. You can see your microphone there if it’s plugged in. You repeat the first option if you don’t see the microphone sign.
- If the second option doesn’t work you plug the microphone into a different USB port.
For example, if the last option doesn’t work, you use a new cable for the microphone. It would also be best to send the microphone in a repair expert.
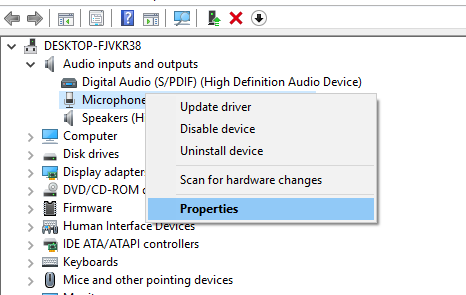
Update the Driver
Another step you can do is to check the Driver on your computer. You right-click the microphone and click the Properties option. Then, you click the Driver tab and the Update Drive selection. Next, you search for the updated driver.
If you don’t see the microphone on the Driver, you search for the microphone in Google. You check if the microphone providers have drivers on their websites.
Sound Preferences Might Help
You already know that Windows has its audio devices that you can see on Default. You need to check and adjust these devices so that you locate the microphone.
- Open the Start Menu
- Go to Audio
- Select the Manage Audio Devices

Then, you select the Recording tab and search for the microphone you would use. Right-click the microphone and then click the Enable option.
Disable the Hands-Free Mode on Bluetooth Devices
The hands-free mode might be the reason why the microphone doesn’t work on Windows. You make that the hands-free mode is disabled. You follow the following steps:
- Open Start Menu.
- Go to the Manage Audio Devices.
- Right-click the hands-free Bluetooth devices then click Disable option.
Check the Sound Settings of Apps You’re Using
Okay, you might be comfortable not checking the audio setting of the voice communication apps you have on Windows. Well, it’s time to check those settings right now. Why? The voice apps have their controls while the audio devices run on default.
Check the App’s Permissions
Many apps need access to your microphone in order to work properly. While it is usually safe to grant this access, it is important to double-check the permissions to make sure that the app is not trying to access any data or information that it should not have access. By doing this, you can ensure that the app is only accessing the microphone and nothing else.
Here are the following steps you need to follow to enable the permission:
- Open the Start Menu.
- Then, search for microphone privacy settings.
- Last, you select “On” on the apps that allow apps to access the microphone.

Now that you know these troubleshooting steps, you can start to use your microphone easily. You can enjoy using your microphone on Windows without any hassle. You can feel comfort and satisfaction in using your microphone by using these steps.
Related posts:
 Best Resources to Learn WordPress
 Odoo Wizard Tutorials
 Is It Safe to Select the “Remember Me on This Computer” Checkbox with Online Accounts?
 What is the Difference between a Fixed Font and a Proportional Font?
 Winlator: Play PC Games on Your Android Device!