WordPress has made creating and formatting content much simpler with the introduction of Gutenberg. This revolutionary tool is a blessing for WordPress users, especially developers, who no longer need to have coding knowledge to create a professional website. To make the most of Gutenberg, the following tips and tricks are essential for users and developers alike to get the best out of it.
Table of Contents
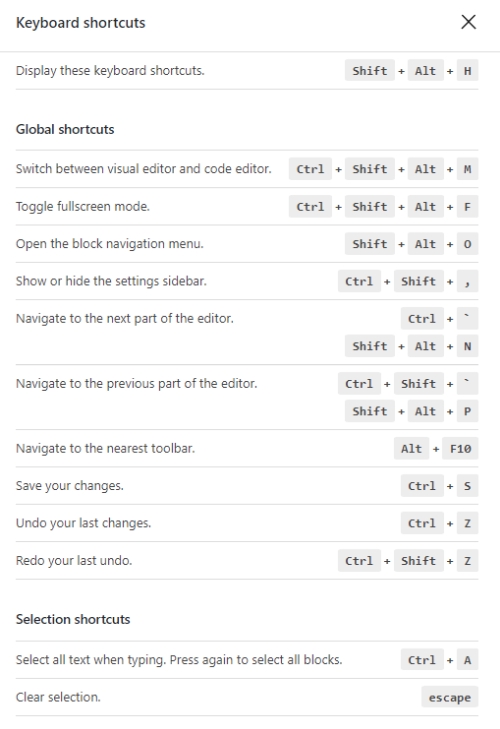
Useful Hotkeys
These are hotkeys for Windows users. If you are using a Mac, replace Ctrl with Command.
- Enter = Add a new block
- Ctrl + Shift + d = Duplicate the selected block(s)
- Alt + Shift + z = Remove the selected block(s)
- Ctrl + Alt + t = Insert a new block before the selected block(s)
- Ctrl + Alt + y = Insert a new block after the selected block(s)
- / = Change the block type after adding a new paragraph
- Esc = Clear selection
- Ctrl + Shift + z = Redo your last undo
- Ctrl + Shift + , = Show or hide the settings bar
- Alt + Shift + o = Open the block navigation menu
- Alt + Shift + n = Navigate to the next part of the editor
- Alt + Shift + p = Navigate to the previous part of the editor
- Alt + F10 = Navigate to the nearest toolbar
- Ctrl + Shift + Alt + m = Switch between Visual Editor and Code Editor
- Ctrl + c = Copy
- Ctrl + v = Paste
- Ctrl + b = Bold
- Ctrl + i = Italic
- Ctrl + x = Cut
- Ctrl + a = Select All
- Ctrl + z = Undo
- Ctrl + s = Save your changes
- Ctrl + p = Print
- Ctrl + u = Underline the selected text
- Ctrl + k = Convert the selected text into a link
- Alt + Shift + x = Display the selected text in a monospaced font
- Alt + Shift + h = Show keyboard shortcuts (Display this help)
10 Gutenberg Tips for Beginners
Utilize the Blocks
The core of the Gutenberg editor is the blocks. These blocks are pre-designed pieces of content that you can add to your post or page. For example, there are blocks for headings, images, videos, quotes, and much more.
Using blocks makes it easier to create content because you don’t have to worry about the underlying code. You simply choose the block you want to use and add your content. This also makes it easier to keep your content organized.
Customize Your Blocks
While blocks make it easier to create content, they’re not always perfect. That’s why it’s important to know how to customize your blocks. Most blocks have a range of options that you can use to change their appearance and behavior.
For example, you can change the background color of a block, add a border, or change the font size. You can also add custom CSS to your blocks to further customize their appearance.
Use Reusable Blocks
Reusable blocks are blocks that you can save and use multiple times. This is a great feature because it allows you to save time and be more consistent with your content.
For example, if you have a standard block that you use for quotes, you can save that block as a reusable block. Then, every time you want to add a quote to a post or page, you simply add the reusable block and update the content.
Take Advantage of the Columns Block
The columns block is a powerful tool for creating engaging layouts on your website. With it, you can create multiple columns and add different types of content to each one.
For example, you can add images, text, and other media to create a visually appealing design. Additionally, you can customize the width and spacing of each column to create a unique look. By taking advantage of the columns block, you can create attractive and eye-catching layouts for your website.
Use the Group Block for Complex Layouts
The group block is similar to the columns block, but it allows you to group multiple blocks together. This is a great feature because it allows you to create complex layouts that would otherwise be difficult to achieve.
For example, you could group a heading block, image block, and text block together to create a more sophisticated layout.
Take Advantage of the Cover Block
The cover block can be used to create a visually compelling post or page. It allows you to add an image or video that expands the full width of the content, adding visual interest and drawing the attention of the reader. You can also use the Cover Block to overlay text or buttons to create a more engaging design.
Use the Table Block for Data-Driven Content
The table block is a great way to add data-driven content to your post or page. This block makes it easy to create tables with rows and columns, which can be useful for presenting data in a clear and organized manner.
For example, you can create a table to show product prices, specifications, or any other type of data that is best presented in a table format. The table block also allows you to sort and filter data, which can be a useful feature if you’re working with a large amount of data.
Use the Gallery Block to Display Images
The gallery block is used to display multiple images in a single block. With this block, you can create a grid of images that can be easily navigated by your visitors. You can create a gallery of product images, travel photos, or any other type of images that you want to showcase.
The gallery block also allows you to add captions to each image, which can be a useful feature if you want to provide additional information about the images.
Use the Embed Block to Add External Content
The embed block on WordPress allows you to add content from services such as YouTube, Vimeo, Twitter, and many more. This block makes it easy to add videos, tweets, articles, and virtually any type of external content to your posts and pages in an efficient and effective manner.
Take Advantage of the Custom HTML Block
The custom HTML block is a great way to add custom code to your post or page. With this block, you can add custom HTML, CSS, or JavaScript to your content.
For example, you can add custom code to create a custom contact form, or you can add custom CSS to change the appearance of your content. The custom HTML block is a powerful feature that allows you to take full control over the appearance and behavior of your content.
Related posts:
 How to Access WordPress Functions in an External PHP File
 Exclude Sticky Posts out of Post Loop in WordPress
 Use .htaccess to Protect wp-admin in WordPress
 How to Change The Default Excerpt Length In WordPress