It is frustrating when you are trying to install a plugin or theme and you get the “Installation Failed: Could Not Create Directory” error message. This error means that your server has insufficient permissions to create a directory with the name of your choosing, or that it does not have write access to directories within its own working area. In this post, we will go through some steps for troubleshooting and fixing this issue so that upgrading WordPress or plugins is easier than ever!
Table of Contents
What causes the “Installation Failed: Could Not Create Directory” error?
One of the most common errors that WordPress users come across is the “Installation Failed: Could Not Create Directory” error.
This error typically occurs when trying to install a new plugin, but it may also happen during website updates as well. The cause for this issue can be due to insufficient disk space, lack of permissions, or problems with your server configuration.
In most cases, lack of permissions is the main cause.
When you install or upgrade a plugin, WordPress needs to create a folder or override the old one and its files. If you don’t have the necessary permissions to do this, the error will occur.
How to fix this error
The fix for the “Installation Failed: Could Not Create Directory” error is relatively simple and can be done in a few different ways depending on whether you’re installing plugins or themes.
For example, if you are uploading plugin files via FTP, make sure that your WordPress install has the appropriate permissions. If this is not the case, you can try to change your WordPress user’s permission by adding a new group called “wordpress-users” or giving more access rights to the existing “wordpress” group on the server.
Since most webmasters use FTP to manage WordPress code files, we will go into detail on how to fix this error via FTP.
Setting File Permission via FTP Client
I recommend FileZilla as an FTP client for this guide. If you are using the other FTP clients, please make sure to set the permission according to your client settings.
- Open your FTP client and log in to the server.
- Select wp_content, wp_includes, and wp_admin then right-click on these directories and click “File permissions…” to set their permissions.
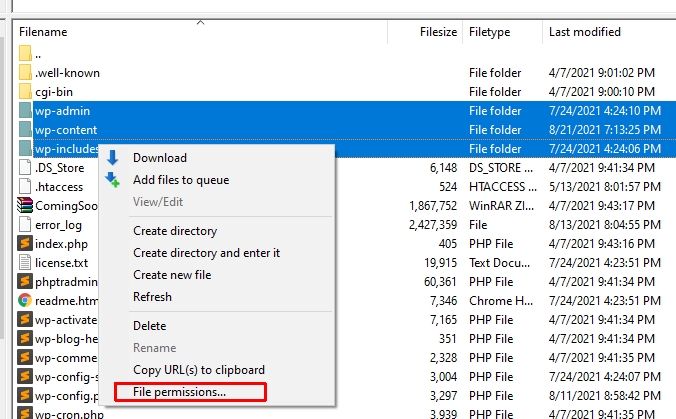
- Pick Numeric value: 755, Recurse into subdirectories, and Apply to directories only.
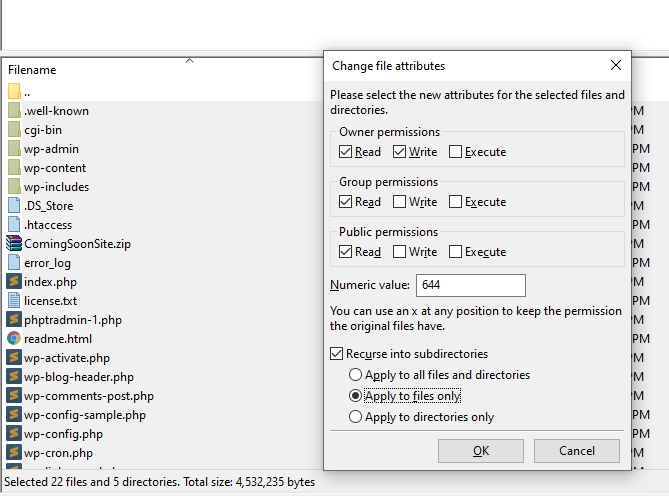
- Select all files and folders of your WordPress installation, right-click then click “File permissions…”.
- Pick Numeric value: 644, Recurse into subdirectories, and Apply to files only.
These tips should help you fix your WordPress “Installation Failed: Could Not Create Directory” error so that installing or upgrading plugins on your website is simple and straightforward. If you’re still experiencing problems after following these steps, please contact us via the comment form below.
Related posts:
 How to Fix the “There Has Been a Critical Error on Your Website” WordPress Error
 Disable a WordPress Plugin Without Access to Your Admin Area
 How to Display Scripts and Styles when a Shortcode Exists in WordPress
 How to Enable or Disable Comments in WordPress
 How to Change The Default Excerpt Length In WordPress