So you want to change your DNS settings on Android? Maybe you’re trying to access a website that’s blocked by your ISP, or you want to improve your privacy and security online. Whatever the reason, changing your DNS settings on Android is a pretty simple process.
In this blog post, we will introduce how to setup up the 2 most popular DNS serves on Android devices.
Table of Contents
What is a DNS Server?
A DNS server is a server that resolves Domain Names into IP Addresses. When you type in a web address, the DNS server will look up the corresponding IP address and then send you to the correct website.
The advantage of using a DNS server is that if your ISP ever changes your IP address, the DNS server will automatically update it and you won’t have to do anything. The disadvantage is that if the DNS server goes down, you won’t be able to access any websites.
Manually Change DNS Server to Google Public DNS
Google’s public DNS servers are a free, global Domain Name System (DNS) resolution service. This service resolves DNS queries for Google Public DNS users around the world. Google Public DNS is an alternative to using your ISP’s DNS servers.
Google Public DNS is a recursive, Anycast DNS service. Anycast is a network topology in which each node sends and receives packets to and from any other node on the network. This allows Google to provide high availability and low latency by geographically diverse users.
Google Public DNS complies with all applicable privacy and security laws and regulations. We do not log or store any personally identifiable information about our users’ IP addresses or query data.
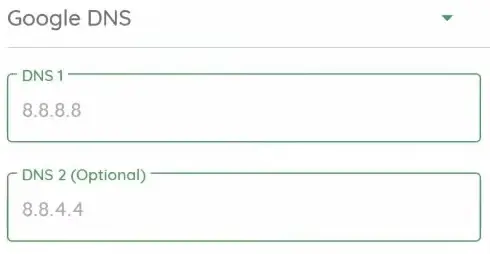
To use Google Public DNS, you need to configure your network settings to use the IP addresses 8.8.8.8 and 8.8.4.4 as your DNS servers. These IP addresses can be used on most network types, including Wi-Fi, cellular data networks, and wired ethernet connections.
Here are steps to change to Google Public DNS:
- Open the Settings app on your Android device.
- Tap “Wi-Fi.”
- Long-press the network you’re currently connected to, then tap “Modify Network.”
- In the “IP Settings” menu, tap “Static.”
- Next to “DNS 1,” enter a public DNS server address. Google’s public DNS addresses are 8.8.8.8 and 8.8.4.4. Once you’ve entered the address, tap “OK.”
Use Cloudflare DNS with 1.1.1.1 App
Cloudflare is a company that provides a variety of internet services, including content delivery Cloudflare is a service that makes it easy for any website to secure itself with SSL. It’s used by millions of websites, including some of the largest and most popular ones in the world. Cloudflare 1.1.1.1 is a new way to use Cloudflare that is more secure and private.
When you use Cloudflare 1.1.1.1, your computer will connect to the Cloudflare network using DNS over HTTPS (DoH). This means that your DNS queries will be encrypted and sent through the HTTPS protocol instead of plain text DNS. This prevents anyone from snooping on your DNS traffic and makes it more difficult for anyone to tamper with your DNS queries.
In addition, Cloudflare 1.1.1.1 will also block most ads and trackers by default. This means that you’ll see fewer ads and be tracked less when you’re browsing the web.
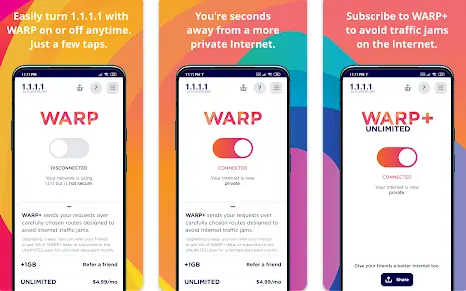
Steps to setup 1.1.1.1 on Android:
- Download the app from Google Play
- Launch 1.1.1.1: Faster Internet and accept the Terms of Service.
- Toggle the WARP button to Connected.
- Install the VPN profile that allows your phone to connect securely to 1.1.1.1.