OpenCV is the most commonly used solution when it comes to detecting faces, identifying objects, classifying human actions in videos, tracking camera and objects movements, extracting 3D models of objects, creating panorama and 360-degree photos, finding similar images, removing red eyes, following eye movements, and many more. Recent OpenCV has supported Android, which makes the process of developing camera and video apps easier. There are many tutorials about importing OpenCV to Android Studio. I will introduce the 2 easiest ways to complete this task.
Table of Contents
Steps to import OpenCV to Android Studio
- Access https://sourceforge.net/projects/opencvlibrary/files/opencv-android/ and download the version you want to use. The latest version is recommended.
- Extract the downloaded zip file.
- Create or open a project that needs OpenCV in Android Studio.
- Import it as a module via File > New > Import Module. You need to copy the path to sdk/java folder. Save the module as a new name (OpenCV) then wait for the importing process to complete.
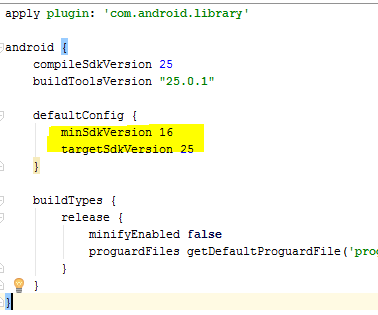
- Modify minSdkVersion and targetSdkVersion opencv’s build.gradle to be the same as your app’s.

- Add compile project(‘:opencv’) to your app build.gradle

- Sync Gradle then you can start using the library.
The SDK comes with 3 sample projects which you can import to Android Studio to learn or test the library.
[java]
import org.opencv.android.CameraBridgeViewBase;
import org.opencv.core.Mat;
public class CameraActivity extends AppCompatActivity implements CameraBridgeViewBase.CvCameraViewListener2 {
private CameraBridgeViewBase mOpenCvCameraView;
@Override
protected void onCreate(Bundle savedInstanceState) {
super.onCreate(savedInstanceState);
setContentView(R.layout.activity_camera);
mOpenCvCameraView = (CameraBridgeViewBase) findViewById(R.id.tutorial1_activity_java_surface_view);
mOpenCvCameraView.setVisibility(SurfaceView.VISIBLE);
mOpenCvCameraView.setCvCameraViewListener(this);
}
@Override
public void onCameraViewStarted(int width, int height) {
}
@Override
public void onCameraViewStopped() {
}
@Override
public Mat onCameraFrame(CameraBridgeViewBase.CvCameraViewFrame inputFrame) {
return null;
}
}
[/java]
Another simple way
If you don’t want to go through those steps for every OpenCV-related project, you can import the library using Gradle. It is thanks to Github user, ctodobom. He converted OpenCV 3.1.0 into a gradle project which can be seen on https://github.com/ctodobom/OpenCV-3.1.0-Android. The advantage of this method is that it is quick, but the disadvantage is that you have to stick with OpenCV 3.1.0.
